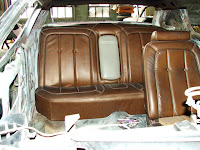
I next removed the material from my original Torino seat back as well as the seat back foam facing to expose the steel framework of the factory seat. I pulled a couple dimensions and found and marked the vertical centerline of the seat back. With both seat backs lying side by side I began to transfer dimensions from the donor seat to the factory seat until I knew exactly where the arm rest frame needed to be located in the original framework. Armed with my cut-off wheel, I began to cut the arm rest structure from the donor seat. Once removed, I turned my attention to the original seat. I had to remove the center run of the seat back springs (I think it was just one set) and then reform the set on either side of center to clear the arm rest framework and allow the arm rest to pivot up and down cleanly.
With the framework temporarily installed (I use cable ties to hold it in place pending trial fit and operation), I next had to position and secure the metal "halo" to the frame to form the "throat" through the seat back for the arm rest. With the halo in place, I removed the arm rest assembly from the seat frame and temporarily installed the original seat back foam pad and upholstery to allow me to use a Sharpie and trace the throat halo shape onto the back of the foam pad. I removed the upholstery and pad again and using a razor knife, cut the throat opening into the seat back foam. The foam pad and upholstery were once more installed and this time an "X" cut was made in the seat back upholstery to allow the material to be pulled down into the throat and secured to allow the arm rest to swing through the seat back. Finally the arm rest frame was reinstalled and the seat was ready for it's first trial fit!


As you can see from the pictures, the installation was very clean and factory in appearance. The arm rest features an integral dual cup holder and storage bin as well as a pass through hatch into the trunk! Due to the "V" bracing under the package shelf, the pass through hatch won't serve much purpose unless it's a convenient place to hide some electronics or something of that nature.
Well next chapter I will show you the reupholstered buckets and back seat cushions. Until then...
ZEBRA 3 OUT

No comments:
Post a Comment