6/27/08

Bringing up the rear... Part 2

After removing the material from the donor seat, I was able to "dig" my way down to the metal skeleton of the seat back. On modern seats (at least this one anyway) evidently the foam is formed around the frame of the seat so the structure is embedded inside the seat cushion. After pulling away the foam in the area, I finally had the arm rest frame exposed. I studied how it was integrated into the main steel framework of the seat back.

I next removed the material from my original Torino seat back as well as the seat back foam facing to expose the steel framework of the factory seat. I pulled a couple dimensions and found and marked the vertical centerline of the seat back. With both seat backs lying side by side I began to transfer dimensions from the donor seat to the factory seat until I knew exactly where the arm rest frame needed to be located in the original framework. Armed with my cut-off wheel, I began to cut the arm rest structure from the donor seat. Once removed, I turned my attention to the original seat. I had to remove the center run of the seat back springs (I think it was just one set) and then reform the set on either side of center to clear the arm rest framework and allow the arm rest to pivot up and down cleanly.

With the framework temporarily installed (I use cable ties to hold it in place pending trial fit and operation), I next had to position and secure the metal "halo" to the frame to form the "throat" through the seat back for the arm rest. With the halo in place, I removed the arm rest assembly from the seat frame and temporarily installed the original seat back foam pad and upholstery to allow me to use a Sharpie and trace the throat halo shape onto the back of the foam pad. I removed the upholstery and pad again and using a razor knife, cut the throat opening into the seat back foam. The foam pad and upholstery were once more installed and this time an "X" cut was made in the seat back upholstery to allow the material to be pulled down into the throat and secured to allow the arm rest to swing through the seat back. Finally the arm rest frame was reinstalled and the seat was ready for it's first trial fit!
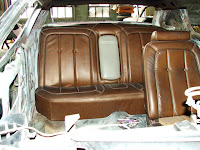


As you can see from the pictures, the installation was very clean and factory in appearance. The arm rest features an integral dual cup holder and storage bin as well as a pass through hatch into the trunk! Due to the "V" bracing under the package shelf, the pass through hatch won't serve much purpose unless it's a convenient place to hide some electronics or something of that nature.

Well next chapter I will show you the reupholstered buckets and back seat cushions. Until then...

ZEBRA 3 OUT
6/26/08

Bringing up the rear... Part 1

With a general direction for the interior established, I wanted to do something a bit special to the rear seat to make them unique as well. Looking at the original rear seat, I noticed that the center panel between the outboard rear seating inserts had a rectangular design that was also mimicked on the rear seat cushion. My first thought was to just eliminate the design and have a smooth panel between the outer seating areas similar to the sport interior.


Then one afternoon while replacing the high mounted rear stop light bulbs in a friends Crown Vic I stumbled on the solution to making my rear seats different... a fold down rear arm rest! The CV had a black interior and with the rest up and from a distance, you really didn't notice it. The wheels began to turn!

The following weekend I paid a visit to my local salvage yard and told them I was looking for a rear seat back with the arm rest. They said to go have a look around and see if I could find something that would do the trick, so off I went. After searching for about an hour, I found what I was looking for. A couple quick measurement revealed it was very close in size to what I would need for the Torino, so I went back in and made the deal.

When I got back to the dealership and put the seat in place, I couldn't believe my eyes... the seat back fit almost perfectly! I threw the matching seat bottom in but it wasn't thick enough to fill the area between the back and the floor, so out it came and for the heck of it I put the Torino seat bottom in place and... tada!! It worked!! As you can see in the attached pics, the new seat back had built in head rests. I toyed with the idea of incorporating them as well but I didn't want to deviate too far from the original design, so I set about determining how to fit the arm rest assembly into the Torino seat backs.


After stripping the upholstery off the new seat back I proceeded to tear away the seat foam to reveal the framework. Once I got down to the shell and could see how the arm rest mechanism tied into the back framework, I pulled out the ole angle head die grinder with a 3" cutoff wheel and went to town.

In Part 2, I'll show you the arm rest installed in the original Torino seat back as well as pics of the seat as received back from the upholsterer. Until next time....

ZEBRA 3 OUT

Interior Motives

Upon arrival of my new Tomato, I decided the first project would be to redo the interior. Basically the interior was in pretty good shape, but the driver's seat was worn and needed to be reupholstered and the door panels weren't in the best of shape either, so I decided that's where I'd begin.


I knew I was going to go with black but I wanted something that had a hint of the exterior color and something that would be unique to my car. I had seen the Sport interior in black with the red stripe around the seat inserts but I thought the red stripe was a bit too much.


I wanted to introduce the color in a bit more subtle way. Looking through some car mags, I spotted an interior shot of a late model vehicle and I knew I had found the look I was after. It had contrasting piping outlining the seat inserts and did away with the piping along the outer edges of the seating surface. That was a start but not 100% what I wanted.

I've had cars before with black vinyl/leather interiors so I knew how hot the seats would get in the summer so I wanted something that would breath for the seat inserts. At the World of Wheels I had seen a '70 Mustang Mach 1 with the deluxe black interior with the horizontal red stripe and the comfortweave material in the inserts that I liked but the material proved to be a bit elusive. One day I noticed a BMW that had perforated inserts and I thought "BINGO" that's it. From a distance the interior would have the OEM look but on closer inspection the custom touches would start to come into view. With the basic look of the interior set, I wanted to also do something a bit different to the rear seat, but I'll save that for next installment.

Stay tuned!

ZEBRA 3 OUT

6/21/08

The new arrival

Delivery of my new toy actually arrived a couple days sooner than estimated. She arrived after dark and was off loaded at work due to the length of time required to get her off the trunk and the space required to do so. Once I got her to her new home I went over her very closely and noticed what I thought were fish eyes in the paint. More on that issue later. At the time I thought no big deal, I'll take care of that when I redo the paint to get the stripe correct. Steve had the stripe extending a bit too far to the rear making the trailing edge of the stripe too long in shape, so I planned on correcting the paint to make the stripe more like the NIKE swoop as seen on the TV car.

MY CAR


TV CAR


I made a mental list of parts I needed to locate to get the car back to stock as well as more like the factory S&H cars. I needed to locate all the AC system parts forward of the firewall case, correct size slot mags, deluxe bumpers and the light group parts to start.

I decided the first course of action was to convert the interior over to black, so I proceeded to remove all the interior pieces, seats, carpet, trim panels and finally the headliner and sail panel trim boards. That's when the true cause of the paint "fish eyes" revealed itself.

At some point in the past my car had been involved in an accident that required a new driver's side quarter panel, outer wheelhouse and the interior bulkhead to be installed and the "fish eyes" weren't in the paint, they were in the BONDO that they used to relevel and reshape the roof!

My cars are stored and worked on at the local Dodge dealership, so I had the body shop manager come over and take a look at the problem. He said since I had the interior gutted out of the car already, if it were up to him, he would go ahead and repair the body so I wouldn't have to tear the car down twice. That made sense to me and I was also concerned about any other hidden areas of damage, so I decided to completely strip the body of all paint to reveal all imperfections. I'll go into a bit more detail in a later posting.

Here are a couple shots on her delivery and the problem area....


ZEBRA 3 OUT

6/20/08

My eBay purchase

I bought my "new" Gran Torino in November 2004 on eBay and had it shipped across country in an enclosed trailer from from Spokane, Washington to Ohio. The car is extremely solid, there is no glass rattle when you close the doors, and they shut like new. The only rust I found when stripping the car was a spot smaller than a playing card low on the passenger front fender ahead of the rocker panel where leaves collected and rusted out the body from behind. This car still had its original factory dual exhaust! The odometer only shows 29,872 miles, but the speedometer has been disconnected for years. Steve Casteel, Mr. Torino and the guy I bought it from, estimated it at under 60,000 miles based upon the other cars he has had.

Here are some pics of the car as purchased and shipped:


Well that's it for this installment. Next time she arrives and the transformation begins....

ZEBRA 3 OUT

History of my car

My car started out in life as a Polar White Gran Torino 2 door hardtop. According to Ford Customer Services, original factory installed options were:
460 CID V8 Engine with 4 BBL Carb
XPL Automatic Transmission (C6)
Polar White Exterior
Saddle Vinyl Bucket Seats with Console and Floor Shift
Automatic Seat Back Release
2.75 Locking Rear Axle
Heavy Duty Suspension
Rear Defroster
Speed Control
AM Radio
AC with Tinted Glass All Around
Bodyside Moldings
Produced 02/06/1976
Saddle Vinyl Half Roof (Dealer installed? Car has molding holes in roof, sail panels, and trunk filler, but vinyl roof is not listed on the build sheet)

Here are a few pictures of the car when Steve purchased it for conversion....


All in all a very solid base for a conversion. My next installment will include pics of my Gran Torino as converted by Steve into a Starsky & Hutch replica. BTW, my car was his 7th conversion.

As of 7/2/20 he has completed 44 conversions!!

Until next time.......

ZEBRA 3 OUT